NAS backup with Arq
Arq can backup NAS shares. Here’s how to set that up on a Mac. (For Windows skip to the “NAS Backup on Windows” section.)
Please note: This article only applies to Arq 5. Arq 6 will take care of mounting the NAS for you.
NAS Backup on Mac
Arq will back up whatever folders you tell it to back up, but it doesn’t know where those folders really exist on your Mac. So, if you want to back up, say, a NAS that isn’t always connected, you may need to tell Arq to connect to the NAS first.
Step 1: Figure out how the Finder mounts your NAS
When you connect to your NAS to your Mac by browsing to it in the Finder, the Finder takes care of “mounting” the NAS volume for you. To find out how, browse to your NAS volume in the Finder; then open the Terminal app and type
mount
and press Return. One of the lines in the output will mention your NAS and look something like this:
//stefan@big._afpovertcp._tcp.local/bignas on /Volumes/bignas (afpfs, nodev, nosuid, mounted by stefan)
In my case, my NAS is called “big” and the share on it is called “bignas”. I connected to it with the username “stefan”. The Finder mounted it at /Volumes/bignas. The “afpfs” tag means the Finder mounted it using AFP; if you see “smbfs” instead, it means the Finder mounted it using SMB.
To recap, the key items in that line are:
- “stefan” -> the account name used to connect to the NAS device
- “big” -> the name of the NAS device
- “bignas” -> the name of the NAS share on the NAS device
- “afpfs” -> the protocol used to connect to it
Step 2: Write a script to mount your NAS
Let’s make a script that mounts your NAS. Open TextEdit and click New Document to create a new text file. Click the Format menu and pick “Make Plain Text”. Then copy/paste the following into Text Edit:
#!/bin/bash

# If the NAS isn't reachable via ping, exit 1.
# Otherwise, the osascript will pop up an unwanted dialog.
ping -c 1 big.local
if [[ $? -ne 0 ]]; then
    echo "ping failed"
    exit 1
fi

osascript <<EOD
tell application "Finder"
if not (disk "bignas" exists) then
mount volume "afp://user:password@big/bignas"
end if
end tell
EOD
Then replace the bold items with the right values for your NAS:
big (in 2 places!) -> the name of the NAS device from Step 1
bignas (in 2 places!) -> the name of the NAS share from Step 1
afp -> the protocol found in Step 1 (“afp” if you see “afpfs” in Step 1; “smb” if you see “smbfs” in Step 1)
user -> your account name on the NAS from Step 1
password -> your account password on the NAS
Pick File->Save from TextEdit’s menu and save your file as “MountNAS.sh” on your Desktop.
Step 3: Make the script executable
Back in Terminal, type:
chmod +x ~/Desktop/MountNas.sh
to make the script executable.
Step 4: Test the script
First, make sure your NAS isn’t already mounted by running:
mount
and checking the output for your NAS. If it’s already mounted, go to the Finder and click the button to “eject” (unmount) it.
![]()
Next, run your script in Terminal:
~/Desktop/MountNas.sh
It might take a few seconds to complete. If you now type:
mount
you should see a line for your NAS.
Step 5: Tell Arq to run the script before starting backup
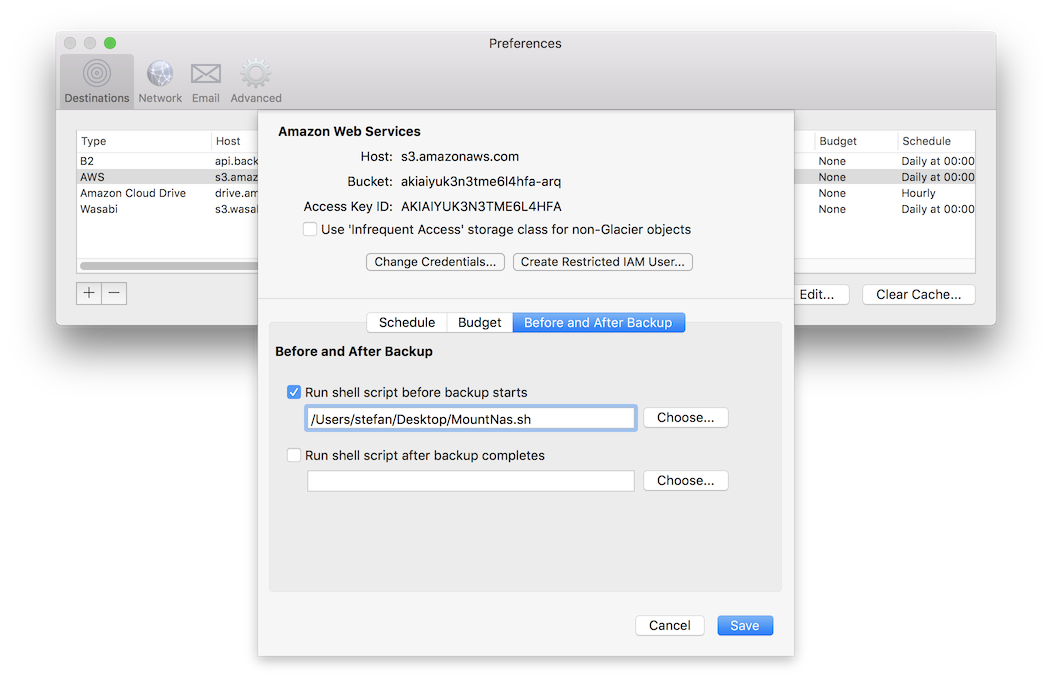
Pick “Preferences” from Arq’s menu, click the Destinations tab, and double-click your destination.
Click the “Before and After Backup” tab.
Check “Run shell script before backup starts” and click the Choose button to find and select your MountNas.sh script. Then click Save, and close the Preferences window.
Step 6: Add folder(s) from your NAS to Arq
Your NAS should still be mounted from Step 4. Pick “Add Folder to Backups” from Arq’s menu to add the folder(s) on the NAS that you want backed up.
Step 7: Test the backup
Go to the Finder and click the eject button to unmount your NAS.
Pick “Back Up Now” from Arq’s menu. Arq will run the script to mount the NAS, and then back up the files you selected. Once the backup is underway, check in the Finder whether your NAS is mounted. If it didn’t mount, then Arq should report an error. If you need help finding the problem, please email us at support@arqbackup.com; we’re always happy to help!
NAS Backup on Windows
On Windows the process is different. In Arq for Windows you can tell supply the parameters for connecting to the NAS and Arq Agent will connect it when it needs to access it.
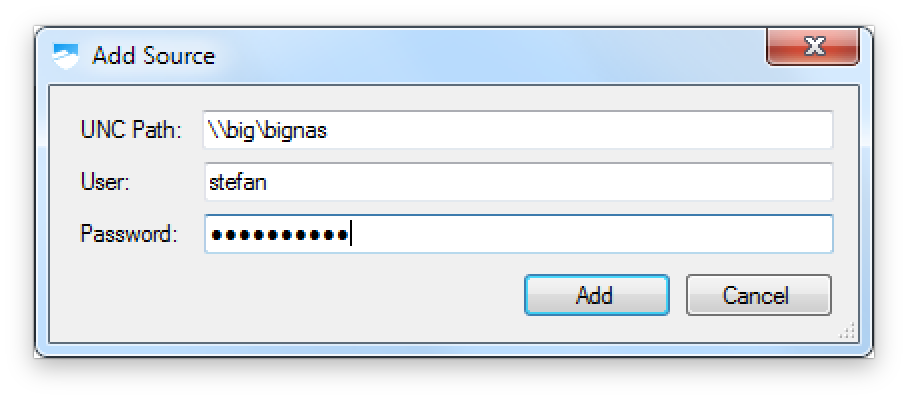
Step 1: Add the NAS in Arq’s preferences
Pick “Preferences” from Arq’s menu, click the Network Volumes tab, and click “Add…” to add your NAS. Enter the UNC path, enter your credentials (if needed), and click OK.
Step 2: Add folder(s) from your NAS to Arq
Pick “Add Folder to Backups” from Arq’s menu to add the folder(s) on the NAS that you want backed up.
Step 7: Test the backup
Pick “Back Up Now” from Arq’s menu. Arq will run the script to mount the NAS, and then back up the files you selected. If it didn’t mount, then Arq should report an error. If you need help finding the problem, please email us at support@arqbackup.com; we’re always happy to help!